Sunday 18 December 2011

Gift Wrap Ideas


Christmas day is one week away!

Time to share some gift wrapping ideas!
Here are three ways with one present


I started with a plain brown paper, the kind you buy from the post office to wrap parcels. The crafty-ness of this paper and the possibilities of cute things you can do to presents with this as your foundation makes brown paper my favourite wrapping paper to use. And the best thing about it is that it works all year round! These ideas could work for just about any occasion. I wanted the presents to fit with the decorating theme of Little House, so I kind of chose mini versions of our Christmas crafts to wrap this parcel.
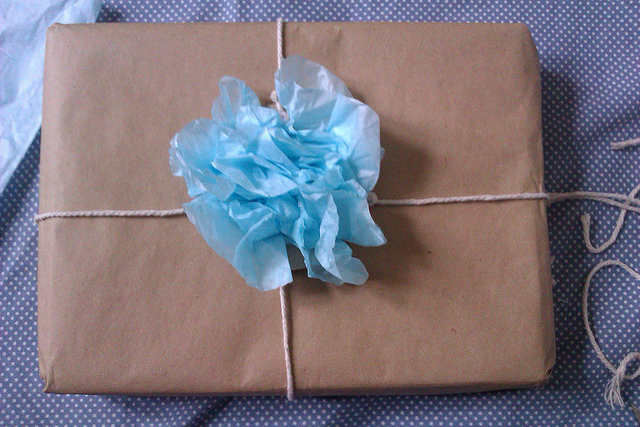


Blossom Pom Parcel


Following on from the Blossom Wreath I made earlier this month, the same idea applies here. First cut out a little card circle and punch four holes around the edges. This is where you will tie your string.


 Next, cut circles out of your tissue, twist the centre to make a blossom, and stick it to your card circle with hot glue. 


Finally tie string through the holes on the card and tie at the back of your parcel.


Ribbons and Fans


These are some paper fan type things I bought from the stationary store a little while ago, thinking to myself "I will totally use those." 
And I totally have not!
If you have any things like this around in your craft stash, scrapbooking stash etc, stick them on a present with a colourful ribbon.


I am a ribbon fiend, I LOVE RIBBON. At Christmas I always buy ribbon from Magnolia Trading on Tory Street. I bought ribbon in the Magic Colour for this year's presents and tied a bow as the finishing touch


Bunting Parcel


My last idea for you today is, of course, bunting!
As you may remember from early this month, bunting is one of my favourite things in the world. I think it's fitting then, to give a little piece of bunting away to a friend. 
Cut out little triangles in a few different types of paper, carefully make small holes at the top, string your twine through. Then wrap the twine around the parcel and tie at the back. Easy!


Have fun!

Leah x

Jar Snowglobes


Well it may not be the fifteenth so to speak but today we made....

DIY Jar snowglobes! woo!

These are a super fun and festive way to reuse an old jar.
You will need:

Hot glue gun
Hot glue sticks
1 Jar with a tight fitting lid
small things to put inside your snowglobe
cold water
glitter/ sequins/ plastic confetti etc


For my snowglobe I used a smaller jar lid to stand my horse figurine up a bit higher as he was hard to see when I placed him on the snowglobes jar lid.


Next I hot glued the bits and bobs I wanted inside the snowglobe onto the 'base' (the jar lid).

You can use anything you like to fill the jar - just make sure whatever you choose isnt going to rot/ rust/ decay/go gross in water... plastic is your friend here!


Fill the jar almost to the very top and put in your 'snow'.
When I first tried out my 'snow' I used coconut. Sadly this failed and just sat on the top of the water.


For my second attempt at 'snow' I used tiny glass beads...this also failed, too heavy!

Luckily when Leah got home she suggested glitter and star confetti. AND HOORAH! IT WORKED!

Woo! Winston the glitter horse is now enjoying a mighty disco-y blizzard!

-Bridget

Christmas Stockings


So despite today well and truly being actually the 17th of December, we shall pretend we are still on the 14th!
We slacked off a bit on the craft front lately due to other commitments. Old jobs, new jobs, better things to do, making unrelated crafty goods..
So anyway, I'll endeavour to get us up to date over the next few posts! HOORAH!
Today I want to discuss Christmas Stockings.
The humble Christmas stocking is just begging for a crafter's touch.
Ive hunted out some fun and simple DIY ideas for making your stockings this Christmas.
Click on each picture to be taken to the tutorial :)

Simple use of felt makes these guys rather cute dont you think?

This idea caught my eye - silhouettes of each person on their own stocking! clever!
   

If you have time on your hands, why not give quilting a go? Or if youre short on time, make them for next Christmas!

I know I love sweaters, so what is better than a sweater stocking?! 

Doile doile doile, life simply isnt as pretty without you.


So this next one isnt so simple, or easy.
But if you are a Harry Hard-out or like a challenge, why not aspire to enduring copious amounts of embroidery?


So clever and amazing and awesome and great, really really really GREAT!


Stay tuned for Little House's own stockings!

- Bridget

Wednesday 14 December 2011

Paper Snowflake Tutorial


Hi there!
Heres another catch up post from the 11th - Paper snowflakes!

For this crafty activity I used the following tutorial from Kerli's blog.
She is one switched on lady, and her tutorial is super easy to follow with amazing end results!
WOO YEAH SNOWFLAKES!

- Bridge


Tutorial: how to make paper snowflakes!

Hello again and sorry I haven't posted for such a long time. I am sure you have all missed me immensely. :D


I entertained the thought of selling these snowflakes, but somehow I have ended up in the tangled web of computer games and abandoned my shop a little. But since it is December, finally, and Christmassy things are justified, I am going to show you how to make them. It's the way I was taught from pvery early age and I have used snowflakes as Christmas decorations ever since, one way or the other.


You will need:

Scissors - best are the longer and sharper kind, and remember to be very careful, and not to use the tips. If you have your kids making snowflakes, choose ones that are medium sized with round tips that open and close easily. It will make a difference. There won't be as many snowflakes cut in half. :D I use big Fiskars ones.

Paper - Now here's the good time to go through your paper recycling bag and find the white printer paper that is only a bit used, like printer calibrations etc. I have used old bank statements, junk mail that has printing only on one side, receipts from internet shops. (Also, I used blue tones from regular magazines etc to make Xmas cards last year.) The best kind of paper is still white printer paper, it is stiff and hard enough and relatively cheap.


The size you need your paper to be is quarter of A4. It will leave your snowflakes about 10cm in diameter. If your snowflake makers are kids, especially not very experienced ones, I would use half an A4 for practice. These bigger snowflakes can go on windows later and they will look very nice. :)


Now to make the template (and be prepared to make about hundred of them for yourself and your children, because the folding can be tricky for little hands, but cutting is sooo much fun! I used to pester my mother to fold more and more and more snowflake bases for me). :)


Take your pre-cut paper and lay it on the table. (I usually do everything up in the air, but table may be easier to start with).


Fold it in half (shorter sides together) and turn 180 degrees so that open ends are at the bottom.


Fold the left top corner over to the right corner and press down make a little fold for the middle. NB! Do not fold the entire length.


Now for the tricky bit: Judging by eye, fold the right corner down by a third. It helps a bit if you place your left thumb on the little fold you just made. (In your mind, note down a point about 5mm to the right of the bottom left corner and line the top right corner up with that point, it should be about accurate.) Don't worry if you don't get it immediately. Practice makes perfect! :) Turn over.


Now fold down the other corner (right one again), lining the corner up with the fold you just made.


Fold the whole thing in half and turn 180 degrees. That is what your snowflake template should look like. Can you see the the lines in the middle? This is where you have to cut off the top, and your snowflake template is ready!


Your snowflake should look like this. Discard the top and you are ready for the fun bit!


You can cut any design you like into your snowflake, but over the years I have found that triangles work the best - they are easy to cut, just straight lines crossing, and the result looks realistic. Edit: I also don't draw anything onto my snowflakes, I just "go with the flow", but you might want to try and draw something on for guidelines: see the photo with all my designs this year below.


I normally start with the top to give my snowflake nice pointy ends. Of course, you can cut just little lines to give it a fringe-y edge or not cut the edge at all.


The very clever bit which results sometimes in spectacular snowflakes is here: after you have cut out a triange, you can cut another triangle into the side of the one you just made!


You can also cut off the bottom tip, to make a cute little star in the middle of your snowflake.


Another double triangle...


And if we open it up... it will look like this. Maybe not the best I have made, but definitely allright.


If you wish, you can use these designs. They will end up looking like this:


Though they aren't in the right order or anything. The best bit of making a snowflake is the opening up bit! You'll never know what they're going to be like, and sometimes relatively simple-looking design can make a surprising result! :)


Happy snowfall!


Kerli,

sincerely


P.S. I tie some thread onto my snowflakes and stick them in the ceiling with some masking tape. ;) Looks great!

Garland!


Part two of the catch up posts!

Today I made a yellow garland.
Basically I cut out semi circles and sewed them together on the sewing machine.
This was a little time consuming but look at ALL THAT YELLOW!


This is Leah's popcorn garland!
She sat very patiently with a bowl of popcorn and threaded them onto a long piece of cotton. ONE AT A TIME. It looks awesome!


- Bridge

Wreath Ideas


So Little House has been on a bit of a hiatus lately on the advent front!
So today we will do catching up! FOUR DAYS IN ONE! WOOO!

First up is Day Nine: Wreath Ideas.
Leah and I made three variations.


WREATH ONE: Tissue Blossom Wreath

For this wreath, Leah cut a ring from some packaging polystyrene.
We also cut out many many tissue paper circles in red and 'tiffany blue' aka the magic colour, and pinched the centre of each one, twisting to create a blossom.
Once we had plenty of blossoms, Leah got to hot gluing them all-over the ring.
Voila! Wreath one!


WREATH TWO: Rag Wreath

For this wreath we used a metal ring. You can find these in most craft stores.
Next we cut strips of fabric around 2 or 3 cm's wide and 20 cm long.
Then we tied the rags all around the wreath until it was good and fluffy like.
Last we tied a longer rag strip to hang the wreath.
Voila! Wreath two!


WREATH THREE: Naturally Unnatural

For this wreath we used a metal ring again.
First I wrapped fake flower stalks and leaves around the ring until it was evenly covered.
Next I hot glued a few fake flowers on.
Next next I hot glued on small pine cones.
Next next next I made tiny bunting saying 'Welcome' and strung it up inside the wreath.
Last I strung a ribbon through the top of the wreath to hang it.
Voila! Wreath three!


- Bridge

Christmas Embroidery Hoop Decorations


A little update on the state of our Christmas tree!
For one, our tree is white. This was due to a lack of fullness in the greener tree choices.
Leah has made popcorn strings and tissue poms, and Ive made a few ornaments, including these embroidery hoop decorations.
To make these I chose fabrics I liked and pulled them tight through the frames...it is really that simple! and they look cute cute cute!


Our work in progress...spot the hipster glasses...

- Bridget

Floral Headband DIY


I got this idea from Leah when she made her own floral headbands and gifted me one!

You will need:

1m Ribbon (choose a colour that will blend with your hair colour)
A cheap wide plastic headband (make sure you try it on first to make sure it will be comfortable to wear)
An arrangement of fake flowers and leaves
Hot glue sticks
Hot glue gun
Scissors


Hot glue one end of your ribbon to the underside of one of the ends of the headband, then wrap the ribbon all the way around the headband, making sure to overlap the ribbon to cover the headband entirely.
Hot glue the other end in place and trim if necessary.

In the previous photo I didnt have cream ribbon so improvised with cream fabric, just cut a strip around 2cm wide and 1m long!easy!

Once you've covered your headband, cut all your flowers and leaves off their stalks (cut them close to the base of the leaf/ flower, but be careful not to cut too close or they'll fall apart on ya).

Get gluing!
Heat up your hot glue gun and glue the flowers and leaves all over, covering all of the headband.
Be strategic with your gluing, seeing the glue isn't ideal, so cover any globs with smaller flowers.
Cover all but 5cm of the headband on each end, this will make your headband look rounded instead of a big crown on your head! (unless of course you want a big crown on your head...)

Do a tidy up (pull off any glue stringy bits, trim anything that looks out of place).
Make sure the glue has dried ENTIRELY before trying it on. Trust me. 


This is the original I was working from - Leah made this! She is such a clever crafty lady.
This one I made for Lauren - she has blonde hair so I used cream to cover the headband. She wanted a pink and blue theme - I think it turned out great.

This is one I made the other night - I used plenty of leaves from the bunches of flowers I bought, sometimes the bunches have 'babies breath' in amongst it, use it! its cute and adds more to the overall look.

This one I used roses - these are trickier to glue on, I found lying them sideways and gluing them in that position worked well.